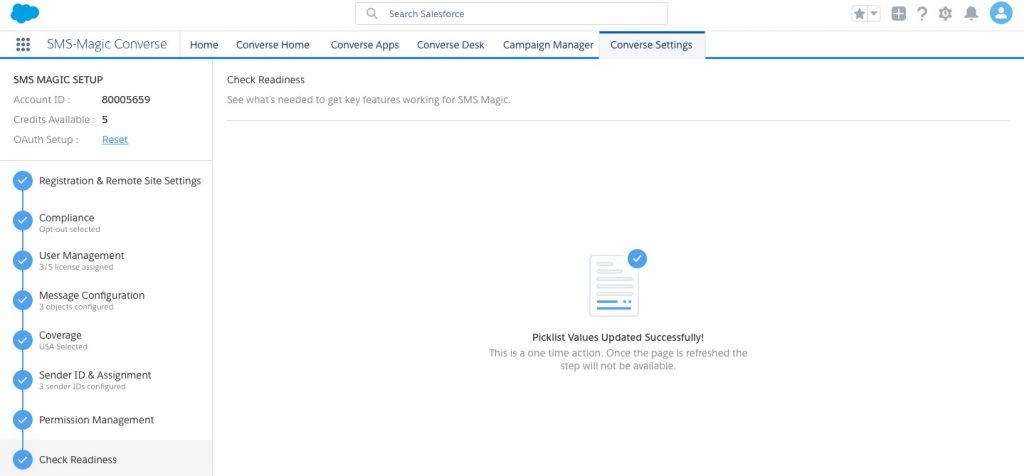
1

Check Readiness

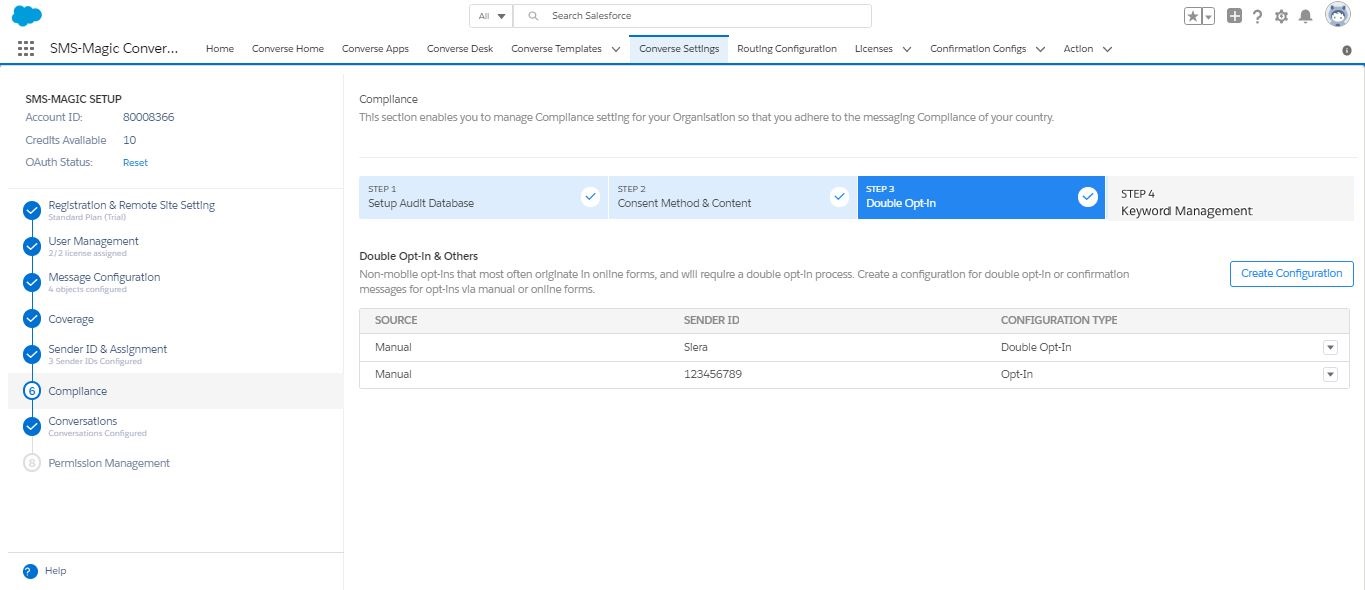
While upgrading to version 1.51 or higher, you need to perform a manual process to map all picklist values created in the earlier version. Salesforce does not automatically upgrade picklist values during the process of migration. The Check Readiness tab helps you with the list of picklist values that you need to integrate after the migration for the selected object.

This is a one-time activity and needs to be done only when you are upgrading from 1.49 or lower versions. The Check readiness tab does not reappear once the migration is completed and the values have been updated.
  1. Log in to SMS-Magic Converse.
  2. Click Converse Settings and then click Check Readiness on the left. The Check Readiness tabbed page appears.
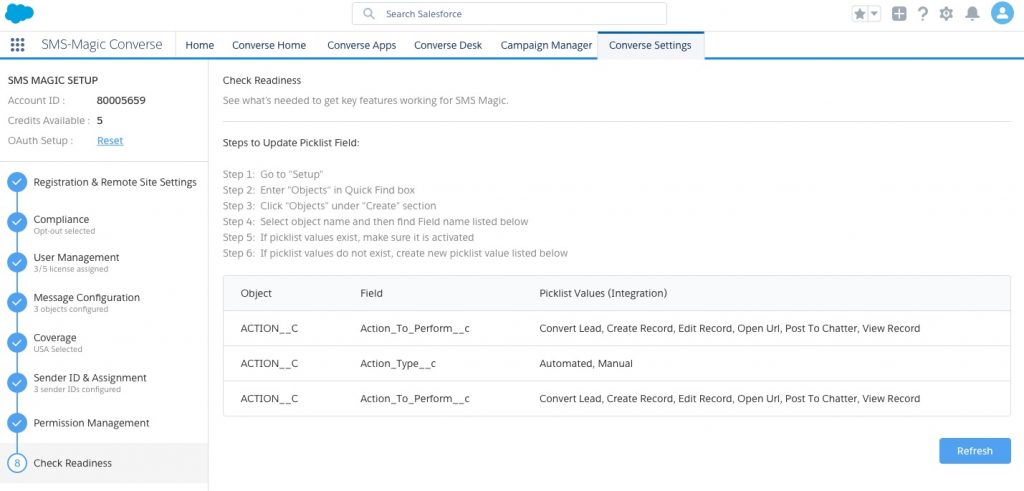
  3. Follow the instructions metioned on the page and click Refresh. The Picklist values are updated and the screen appears as shown.


Conversations Overview 1.59

 There are three sections under which you can define the Conversation layout and view:

Converse Desk Layouts – Under the Converse Desk Layouts tab, you can help users configure the following:

  • Conversation Filters and Global Filters for specific users and profiles.
  • Color theme for the Converse Desk.
  • Conversation Topic Layout.

Message Settings – Under the Message Settings tab you can define the following:

  • The color theme for displaying Automated messages.
  • Information to be displayed under every Incoming and Outgoing message bubble.
  • Information to be displayed under the information lookup fields.

General Settings – Under the General Settings tab, you can disable or enable user privileges for the following features:

  • Send Canned Responses
  • Define Character Limit for Messages
  • Internal Note
  • Configure CRM Actions
  • Configure Related Conversation


Create a Layout

  1. Log in to Salesforce and access SMS-Magic Converse.
  2. Click the Converse Settings tab.
  3. Click Conversations on the left.

  4. Click Converse Desk Layouts tab.
  5. Click Create New Layout in the Configure Converse Desk Layout section. The Create New Layout pop-up window appears.
  6. Under the Layout Name type a name for the layout.
  7. Under Conversation Filters, select the filters for categorizing conversations.
  8. Under Global Filters, select the filters for viewing the conversations.
  9. Select the user or profile names for whom the layout will be available in the Select Users, profile field.
  10. Click Save. The new layout is found in the Configure Converse Desk Layout list.
  11. Click Save Changes at the bottom of the Converse Desk Layouts tab page.


Edit Double Opt-in Configuration

  1. Under Double Opt-in & Others, click next to the configured Double Opt-In source that you want to edit and click Edit. The Edit Configuration screen appears.
  2. Edit the details as required.
    Refer to the table below for more details:
  3. Click Validate and Save. The Double Opt-in & Others screen appears.
  4. FIELD DESCRIPTION
    Source Select the non-handset source from which you want to create consent records.
    Confirmation Message Sender ID Select the Sender ID from which the confirmation message will be sent.
    OPT-IN
    Send Confirmation Message Select the option to send a confirmation message.
    Double Opt-In Select the option to enable the customer to send a double Opt-in.
    Opt-in Confirmation Message Type the confirmation message that will be sent out for an Opt-in request.
    This field appears only if you select the Double Opt-in option.
    Double Opt-in Message Type the message that will be sent out to request for a Double Opt-in.
    This field appears only if you select the Double Opt-in option.
    Double Opt-In Keyword Type the keyword that will be used for sending double opt-in requests.
    This field appears only if you select the Double Opt-in option.
    Double Opt-In Confirm Message Type the message that will be sent out to confirm a Double Opt-in request.
    This field appears only if you select the Double Opt-in option.
    OPT-OUT
    Opt-Out Confirmation Message Type the message that will be sent out to confirm an Opt-out request.
    This field will appear if you do not select the Double Opt-in option.


Custom Permission To User

  1. Log in to Salesforce and click and then click Setup.The Setup home page appears.
  2. Type Profiles in the Quick Find search box and then click Users in the search results. The Profiles page appears.
  3. Click a profile for which you want to enable the custom permissions. The User profile page appears.
  4. Click Enabled Custom Permissions. The Enabled Custom permissions page appears.
  5. Click Edit. The Enable Custom Permissions page appears.
  6. Under Available Custom Permissions select the permissions you want to enable for the profile and click 
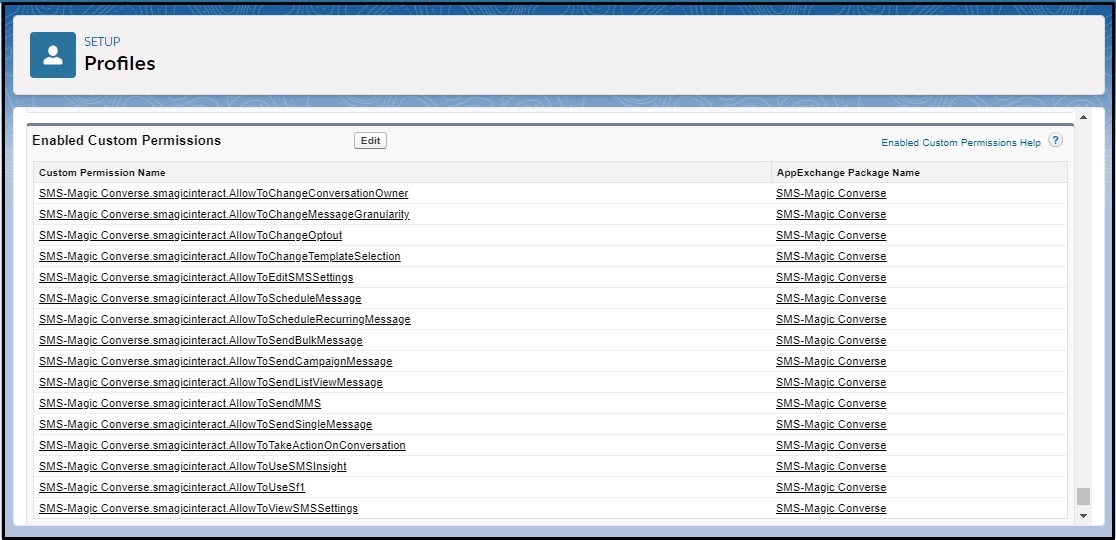
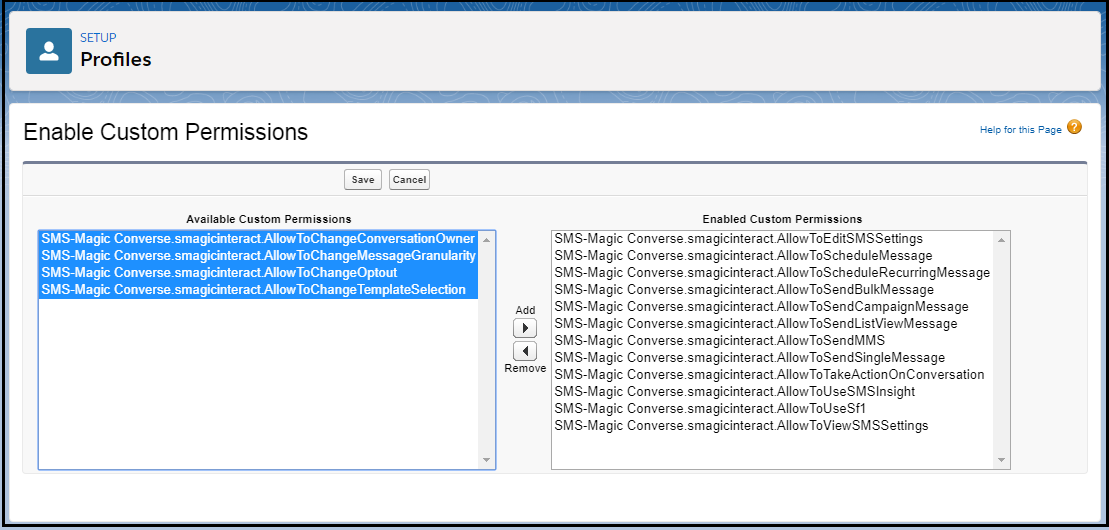
to move it to Enabled Custom permissions.
  7. Click Save.


Assign Permission To Single User

  1. Log in to Salesforce.click .
  2. Click and then click Setup. The Setup Home page appears.
  3. Type Users in the Quick Find search box and then click Users in the search results. The All Users page appears.
  4. Click the user name to which you want to assign the permission set. The User Details page appears.
  5. Click Permission Set Assignment. The Permission Set Assignment section appears displaying the permissions that have been assigned to the user.
  6. Click Edit Assignment. The Permission Set page appears.
  7. Select a permission set from the Available Permission Sets and move it to Enabled Permission Sets list.


Edit a Layout

  1. Log in to Salesforce and access SMS-Magic Converse.
  2. Click the Converse Settings tab.
  3. Click Conversations section on the left.
  4. Click the Converse Desk Layouts tab.
  5.  

  6. Under Edit, click  next to the layout you want to modify and then click Edit from the drop-down menu that appears. The Edit Layout pop-up window appears.
  7. Under Conversation Filters, select the filters you require or clear those that are not relevant.
  8. Under Global Filters, select the filters you require or clear those that are not relevant.
  9. Add or remove the user and user profile names in the Select User, Profile field.
  10. Click Save.
  11. Click Save Changes at the bottom of the Converse Desk Layouts tab page.


Select Desk Theme

  1. Log in to Salesforce and access SMS-Magic Converse.
  2. Click the Converse Settings tab.
  3. Click Conversations section on the left.
  4. Click Converse Desk Layouts tab.
  5. Under the Color section, slide the toggle button to enable the feature.
  6. Select a color or pattern for the desk theme.
  7. Click Preview Theme. A separate pop-up window displays a preview of the Converse Desktop.
  8. Click Save Changes at the bottom of the Converse Desk Layouts tab page.


Customize Conversation Topic View

  1. Log in to Salesforce and access SMS-Magic Converse.
  2. Click the Converse Settings tab.
  3. Click the Conversations section on the left.
  4. Click the Converse Desk Layouts tab.
  5. Under Conversation Topic, select the object.
  6. Under Template Name, select the relevant templates from the drop-down lists.
  7. Under Field Name, select the relevant name for the field from the drop-down list.
  8.  

  9. Click Save Changes at the bottom of the Converse Desk Layouts tab page.


Automated Message Color

  1. Log in to Salesforce and access SMS-Magic Converse.
  2. Click the Converse Settings tab.
  3. Click the Conversations section on the left.
  4. Click the Message Settings tab. The Message Settings tabbed page appears.
  5. Under the Display Automated Message, slide the toggle button to enable the feature.
  6. Select a color.
  7. Click Save Changes at the bottom of the Message Settings tab page.


Message Bubble Information

  1. Log in to Salesforce and access SMS-Magic Converse.
  2. Click the Converse Settings tab.
  3. Select the Conversations section on the left.
  4. Select the Message Settings tab.
  5. Under Message Bubble Information select the relevant check boxes to define the information to be displayed under each message bubble.
  6. Click Save Changes at the bottom of the Message Settings tab page.


Add Template to Content Type

  1. On the Content Type page, under Templates, click View. The Templates pop-up window appears.
  2. Click Add Templates. The Add New Template page appears.
  3.  

  4. Enter the details to create a new template.Refer to the section on Create New Template for more details.
  5. Click Create.The template is created.
  6. Under Converse Settings, click Compliance. The Compliance page appears.
  7. Click Step 2. The list of Content types appear.
  8. Under Templates, click View. The Templates pop-up window appears displaying the tagged template if you have already tagged it with the content type at the template creation stage.
  9.  

    While creating templates, you can select the content type in the drop-down list.This will tag the template.


  10. If your templates are not tagged, click Add Templates. The Tag Template pop-up window appears.
  11.  

  12. Select the template you want to tag.
  13. Click Apply. The Templates pop-up window appears displaying the tagged template.
  14.  

  15. Click 
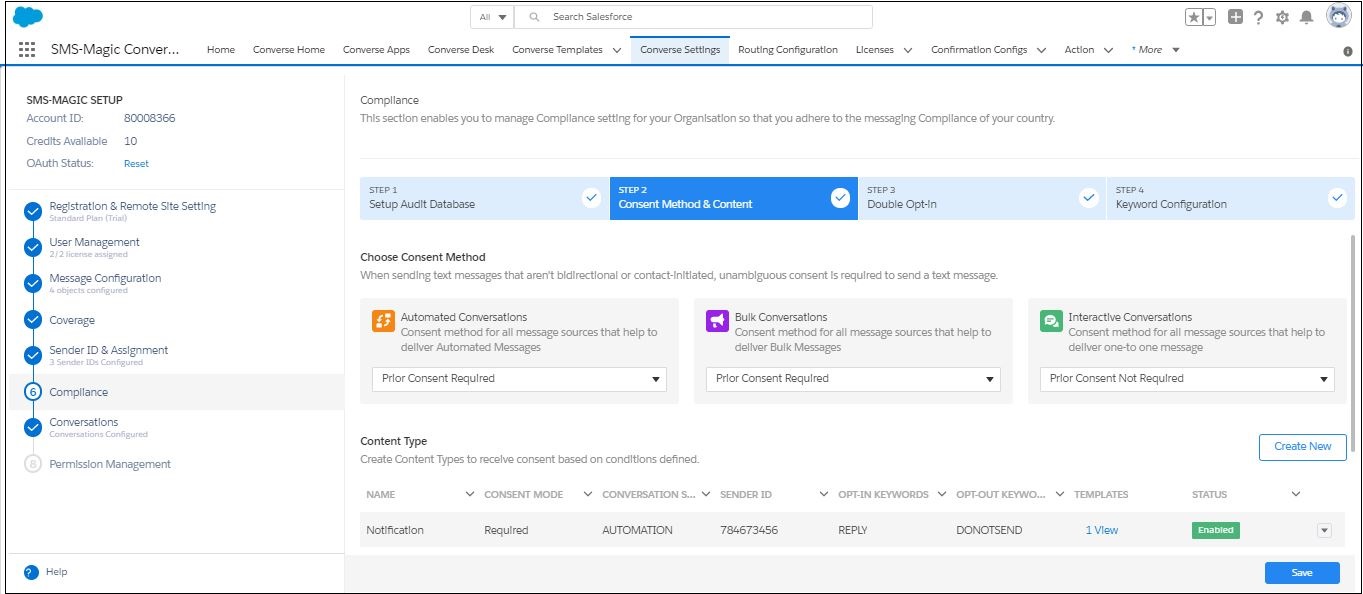
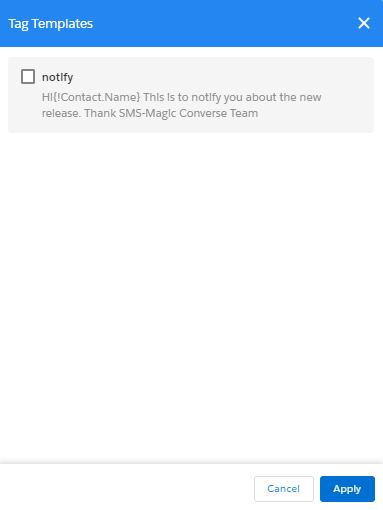
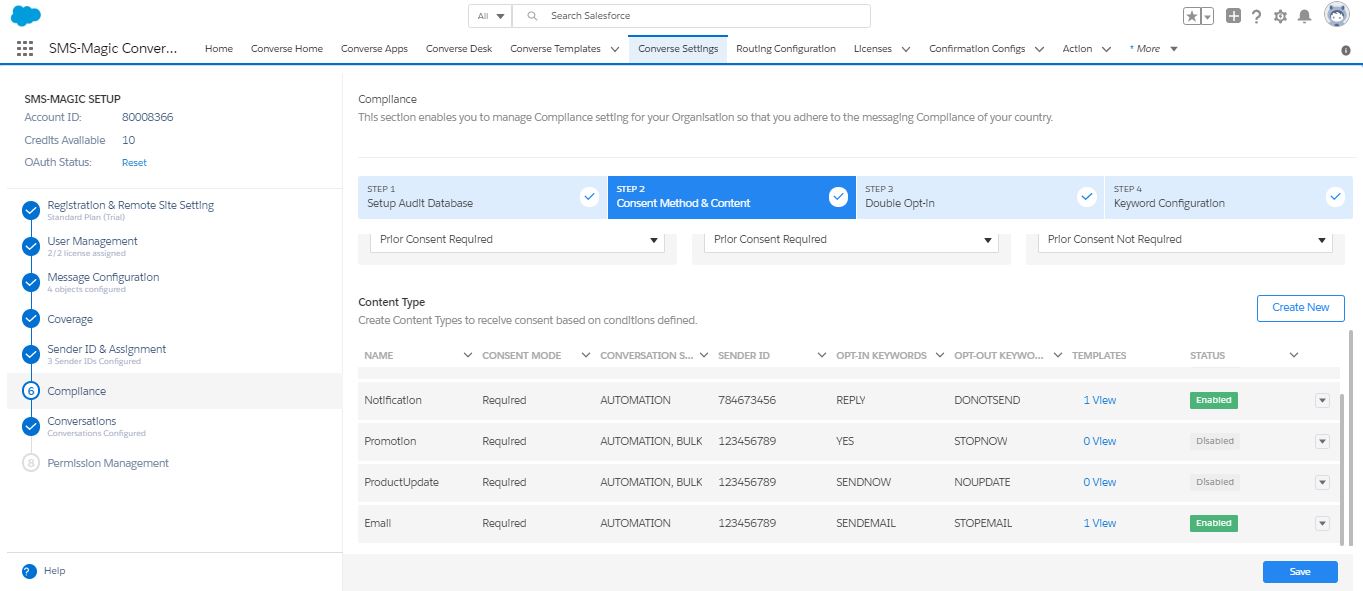
. The Content Type page appears displaying the Template column for the Content Type updated with 1 View.


Information Lookup Field

  1. Log in to Salesforce and access SMS-Magic Converse.
  2. Click the Converse Settings tab.
  3. Click the Conversations section on the left.
  4. Click the Message Settings tab. The Message Settings tabbed page appears.
  5. Under Lookup Fields Display and Configuration, slide the toggle button to enable or disable the feature.
  6. Select the relevant fields that you want to be displayed as an information lookup field.
  7. Click Save Changes.


Delete Content Type

  • On the Content Type page, select next to the content type you want to delete and click Delete. The Delete Confirmation pop-up window appears.
     
  •  

  • Click Confirm. The Content Type Configuration is deleted.
  • On the Content Type page, select next to the content type whose status you want to change and click Status. The Change Content Type Status pop-up window appears.
  • Slide the toggle to the new status. For example, slide the toggle from Disabled to Enabled.
     
  •  

  • Click Save. The Content-Type status is changed.


  • Configure Canned Responses

    1. Log in to Salesforce and access SMS-Magic Converse.
    2. Click the Converse Settings tab.
    3. Select the Conversations section on the left.
    4. Click General Settings tab.
    5. Under Reply Using Canned Responses (Only Templates), slide the toggle button to enable the feature.
    6. Click Advanced Setting. The Reply Using Canned Responses pop-up window appears.
    7. Under Users and Profiles, type any three letters of the User name or profile and select the relevant name from the list that appears.
    8. Under Do you want to enable Canned Responses? click and select Yes if you want to enable this feature.
    9. Click Save. The General Settings tab page appears displaying the modified configurations.


    Define Character Limit

      User profiles for which you have enabled the Reply with Canned Responses feature are not able to create and send custom messages. Therefore, it will overwrite all character limits you may have defined for the same User profile. Do not enable the Canned Responses feature if you want to define Character Limits for any specific user profile.
    1. Log in to Salesforce and access SMS-Magic Converse.
    2. Click the Converse Settings tab.
    3. Select the Conversations section.
    4. Click General Settings tab.
    5. Under Character Limit of A Message, slide the toggle button to enable the feature.
    6. Click Advanced Setting. The Character Limit of a Message pop-up window appears.
    7. Under Users and Profiles, type any three letters of the User name or profile and select the relevant name from the list that appears.
    8. Under Enter Character Limit type the maximum number of characters each message sent by the selected user profiles, can contain.
    9. Click Save. The General Settings tab page appears displaying the modified configurations.