1

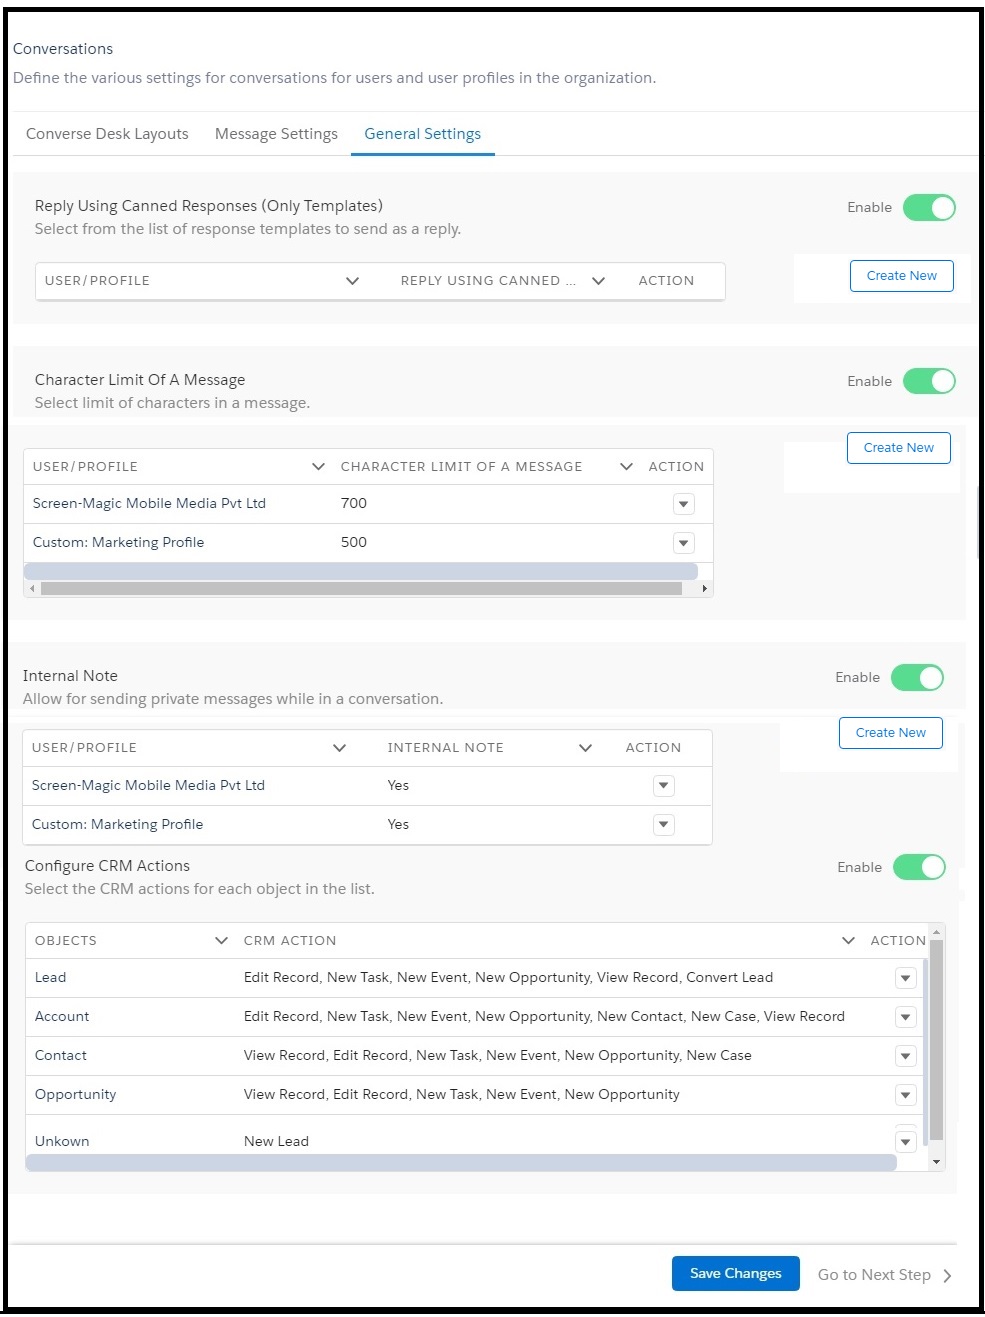
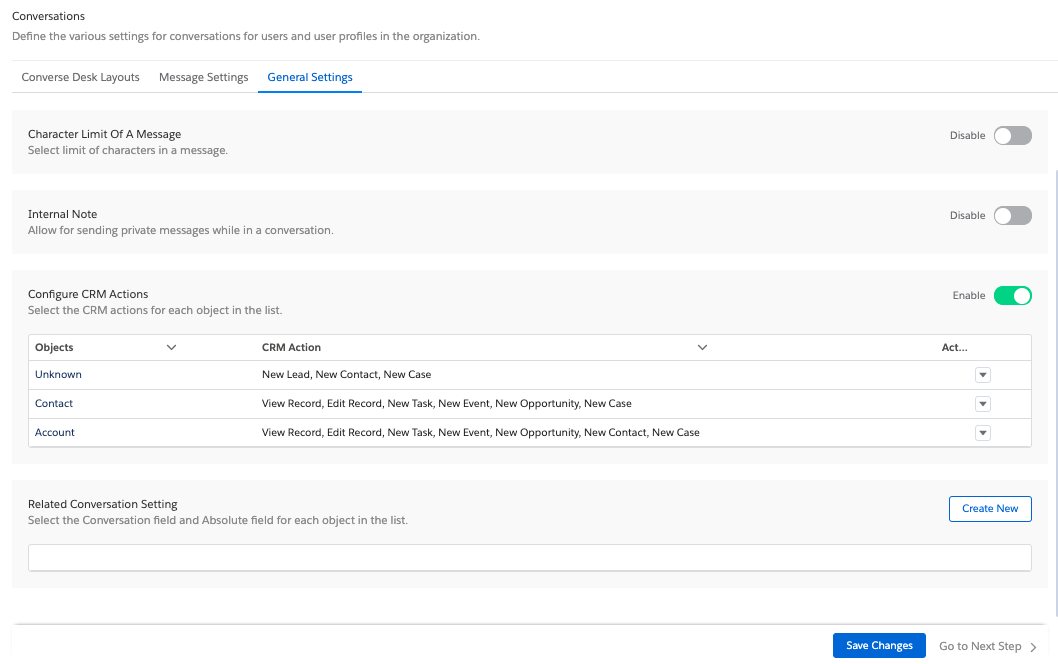
Define Character Limit 1.58

    User profiles for which you have enabled the Reply with Canned Responses feature are not able to create and send custom messages. Therefore, it will overwrite all character limits you may have defined for the same User profile. Do not enable the Canned Responses feature if you want to define Character Limits for any specific user profile.
  1. Log in to Salesforce and access SMS-Magic Converse.
  2. Click the Converse Settings tab.
  3. Select the Conversations section.
  4. Click General Settings tab.
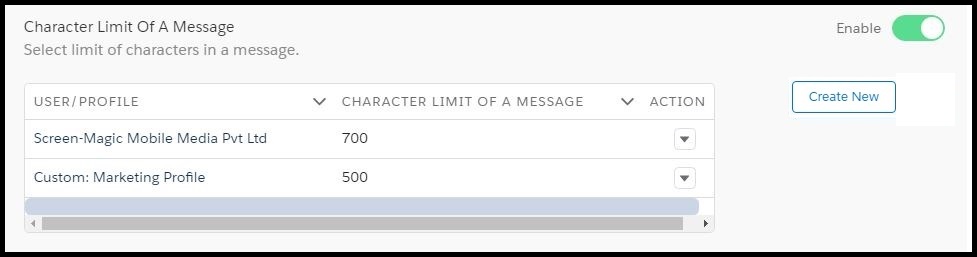
  5. Under Character Limit of A Message, slide the toggle button to enable the feature.
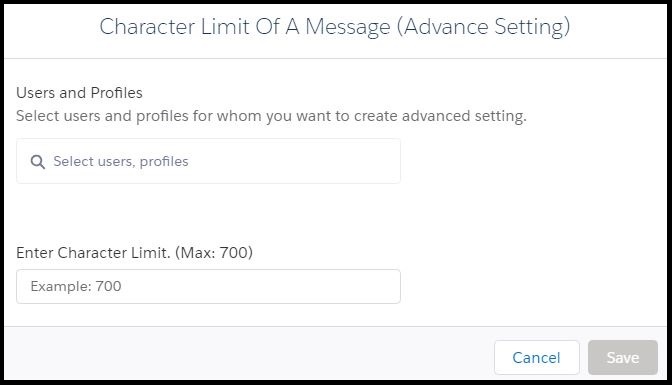
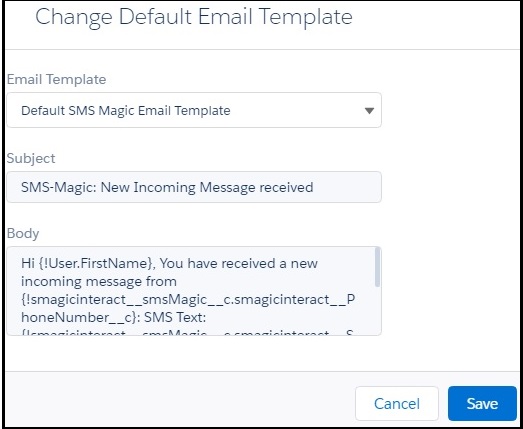
  6. Click Advanced Setting. The Character Limit of a Message pop-up window appears.
  7. Under Users and Profiles, type any three letters of the User name or profile and select the relevant name from the list that appears.
  8. Under Enter Character Limit type the maximum number of characters each message sent by the selected user profiles, can contain.
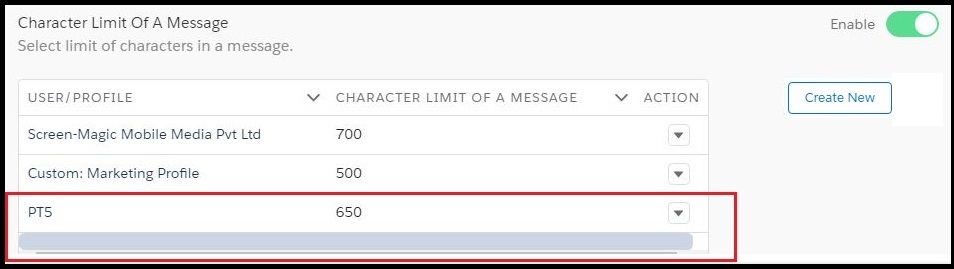
  9. Click Save. The General Settings tab page appears displaying the modified configurations.


Configure CRM Actions 1.58

  1. Log in to Salesforce and access SMS-Magic Converse.
  2. Click the Converse Settings tab.
  3. Select the Conversations section.
  4. Click General Settings tab.
  5. Under Configure CRM Actions, slide the toggle button to enable the feature.
  6. Click and then click Edit. The Configure CRM Actions for Account pop-up window appears.
  7. Select CRM actions for the object.
  8. Click Save Changes.
  9. Click Save Changes at the bottom of the General Settings tab page.


Sender ID and Assignment Overview 1.58

A Sender ID is an alphanumeric name or number that appears on the mobile device and helps to identify the sender of the message. It can be a long code or shortcode that you assign to a single user, multiple users, or a profile.

You can configure Sender IDs for different organizations, teams or individuals to appear as you want on the recipient’s mobile device(s).

You can configure the default templates you wish to use to notify the User assigned to a Sender ID on any incoming message.

In case the Sender ID is assigned to multiple users or a profile, the incoming message notification is sent as per the rules defined in the Sender ID assignment settings page.
For example, if the Notification Recipient field displays Last Sender as its value, then the incoming message goes to the last user (within the profile or group of users) who sent the message.

In the Manage Notification pop-up window, you can configure the notification of a Sender ID. You set the recipient of the notification as well as select the email template to be used for notifying the recipients.

To know more about email templates and how to create them, click here.

You can associate an incoming number to a Sender ID only if it is defined for  outgoing messages. Country-wise restrictions determine if the same Sender ID can be used for both incoming or outgoing messages.


Add Sender ID 1.58

  1. On the Sender ID and Assignment page, click Add Sender ID. The New SMS SenderId pop-up window appears.
  2. Enter the information in each field. Fields marked with a red asterisk are mandatory.
    Refer the table below for more details on individual fields.
  3. Click Save.
Field Description
Label A name to identify the new number or Sender ID.
Sender ID The number procured and assigned to the account.
Used for The Admin assigns how the Sender ID is used based on the requirements of the organization. The options are:•Both – The Sender ID is used for both incoming and outgoing messages.• Incoming – The Sender ID is used only for incoming messages.• Outgoing – The Sender ID is used only for outgoing messages.
When you select this option you can associate another number with this Sender ID for sending incoming messages.
Description A brief description of the Sender ID.


Edit Sender ID 1.58

  1. Click next to the Sender ID you want to edit.
  2. Click Edit. The Edit SMS Sender ID pop-up window appears.
  3.  Edit the information as required.
    Refer the table below for more details on individual fields.
  4. Click Save.
Field Description
Label Type a name to identify the new number or Sender ID.
Sender ID Type the number procured and assigned to the account.
Used for Select how you want to assign the Sender ID based on the organization’s requirements. The options are:•Both – The Sender ID is used for both incoming and outgoing messages.•Incoming – The Sender ID is used only for incoming messages.•Outgoing – The Sender ID is used only for outgoing messages.
When you select this option you can associate another number with this Sender ID for sending incoming messages.
Description A brief description of the Sender ID.

4. Click Save.


Remove Sender ID 1.58

  1. On the Sender ID and Assignment page, click next to the Sender ID you want to remove. The drop-down menu appears.
  2. Click Remove. The Remove Sender ID pop-up window appears.
  3. Click Delete.


Manage Notifications 1.58

  1. On the Sender ID and Assignment page, click next to the Sender ID for which you want to manage notifications. The drop-down menu appears.
  2. Click Manage Notifications. The Manage Notification pop-up window appears.
  3. Under Recipients, select the recipient who will be notified on receiving an incoming message.
    Refer the table below for more details on the available options for notifying recipients.
Field Description
Don’t notify to anyone The Sender ID does not receive a notification.
User assigned to Sender ID The user assigned to the Sender ID receives the notification.
Last Sender The last user of the Sender ID receives the notification.
This is relevant when the Sender ID is assigned to multiple users or a profile.

4. Under Email Template, select the email template you want to send with the notification. The Subject and Description fields below display the template content.

5. Click Save.


Associate Incoming Number 1.58

  1. On the Sender ID and Assignment page, click next to the Sender ID to which you want to associate an incoming number. The drop-down menu appears.
  2. This feature will be available only for Sender IDs that have been defined for use in Outgoing messages.

  3. Click Associate Incoming Number. The New Alpha Sender ID Map pop-up window appears.
  4.  Under both Outgoing Sender ID and Incoming Sender ID, do one of the following:
    • Click New SMS Sender ID, to create a new Sender ID.
    • Refer To Add a Sender ID topic for more information on creating new sender IDs.

    • Search for the Sender ID that you want to associate with the selected  Sender ID.
  5. Click Save; Or
  6. Click Save & New to save the action and create another Sender ID.


Configure Notifications 1.58

  1. Under Notification on Incoming slide the toggle button to receive notifications for an incoming message. You can disable all notifications by sliding the toggle back.
  2. Click View. The View Default Email Template pop-up appears.
  3. Click Close. The  Sender ID and Assignment page appears.
  4. Click Change. The Change Default Email Template pop-up window appears.
  5. Under Email Template, select a new email template drop-down list, if required.
  6. Click Save.


Procure Long/Short Code 1.58

You need to procure incoming numbers to receive messages in your Salesforce organization.

Incoming numbers can be procured from our Portal where you can view the rates for individual countries and the available SMS packs.

  1. Click https://app.sms-magic.com/pricing/topup. The Portal top-up page appears.
  2.  

  3. Click Buy Inbound Number. The Get A Quote page appears.
  4. Enter the details as required.
  5. Click Get A Quote. The SMS-Magic Sales team will receive an email requesting a quote for the required quantities of Incoming number.
  6. The Sales team reverts with a response and helps you procure the required numbers.

Contact the sales team at sales@screen-magic.com for more details on purchasing incoming numbers.