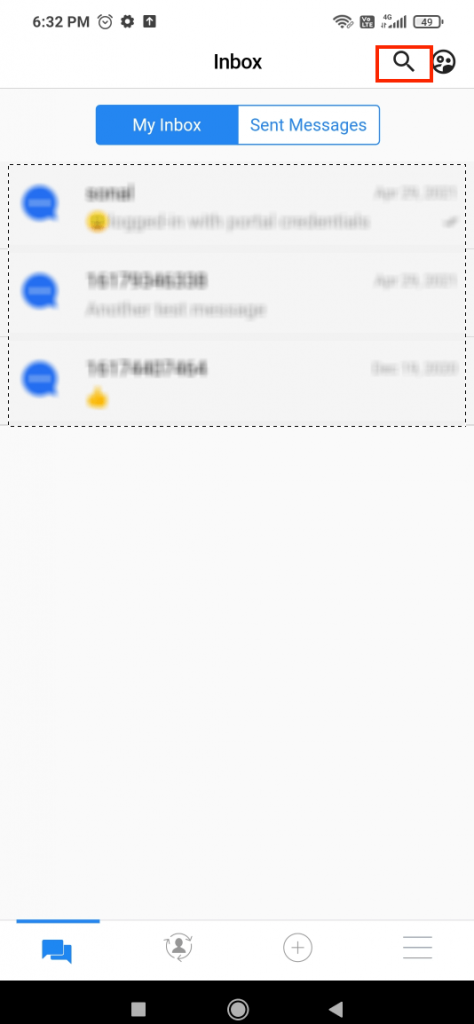
The Search field allows users to search for a contact by name or a number. All contacts that are added to your ‘Contacts’ can be searched using this ‘Search’ field. Contacts from your CRM can also be accessed using the Search field. The search feature is available in the Inbox, Contacts, and Templates tab.
Click on the search icon as highlighted in the above image. The following field will appear:
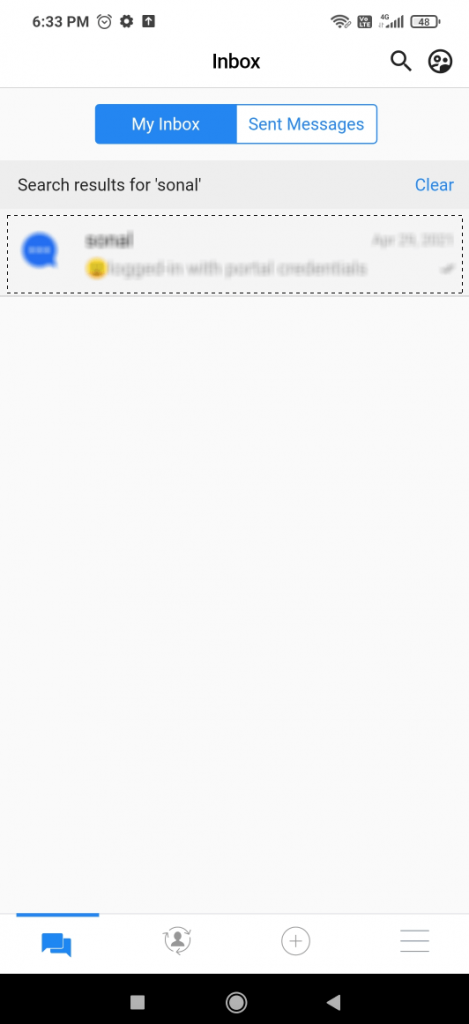
The ‘Search’ field on the Inbox tab helps you search the conversations with a customer. If you search for a contact with whom a conversation exists, then your search result will appear as follows:
You can click on the contact to view/continue your conversations.
Filter Field
|
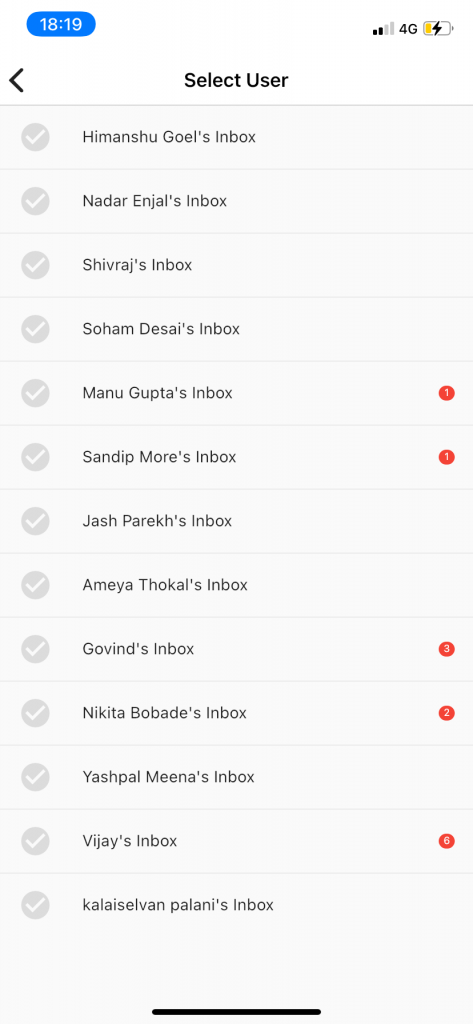
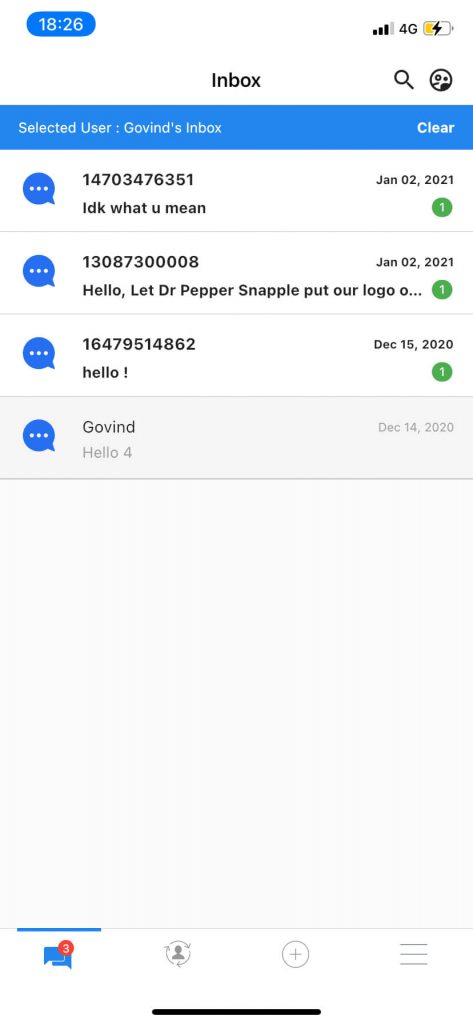
The Filter field allows users to select a user and view the inbox of that selected user.
Click on the filter icon on the top right corner and the following list of users will appear:
Select a user to view the messages in the inbox, the following inbox of the selected user will appear:
Inbox
|
Inbox is a list of all the new, read, and unread conversations. All these conversations are synced with the Zoho CRM. Keep a track of all your conversations, assign conversations and respond to conversations quickly. From the Inbox, users can also mark conversation(s) as read or unread, pin conversation(s), and take a follow-up with a customer if they have not replied to a conversation for a long time. A user will be able to see only his conversations and not the conversations of other users. Only the user with ‘Admin’ rights will be able to see the conversations of all the users.
Key information visible on the list of conversations:
Inbox- shows all messages sent and received
Recipient name
A snippet of the last sent or received message
The timestamp of the last message
New message indicator
Waiting time – The waiting time is displayed if an agent has not replied to a message received from the customer/end-user. If the agent doesn’t reply to the customer or end the recipient’s message for more than 30 minutes, then a waiting time will be displayed as shown in the image above(in red). This acts as a reminder to the agent to reply to the message. The waiting time will be displayed until the agent opens the message and replies to it.
Follow-up nudges- If an agent has sent a message to a customer and if the customer has not replied, the agent can follow up with them by adding a follow-up nudge to the conversation as shown in the image above(in orange). If the message is opened (whether a reply is sent or not), the follow-up nudge will disappear.
Overview
|
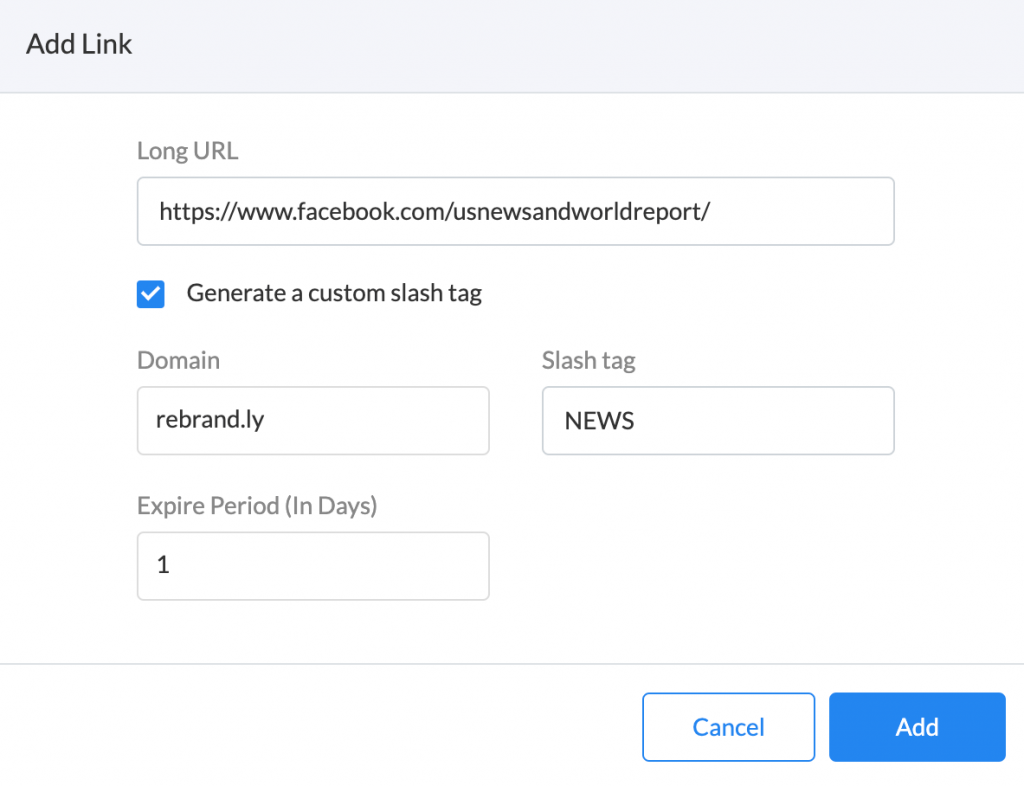
The URL Shortening and Tracking feature allows the user to shorten a URL thereby reducing the characters in the link and hiding the parameters which deter recipients from clicking on the link. Clicks on all short links created using SMS-Magic are tracked and the information such as the total count of the click is displayed.
As you can see in the screenshot below, once the URL is entered and all other details are added and once you click on the ‘Add’ button, the new shortened URL is generated:
Configuration Steps
|
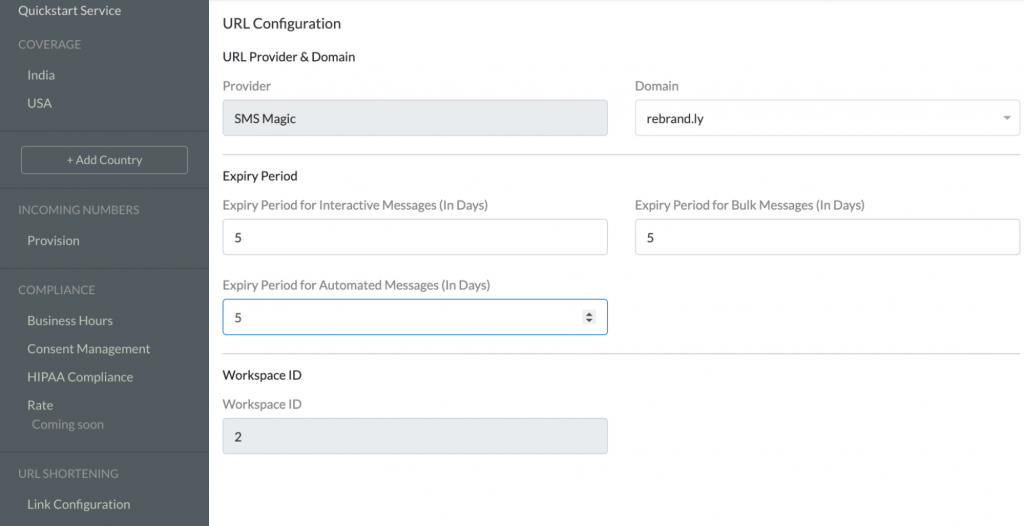
Portal administrators can configure the settings in URL Shortening features using the SMS setting tab.
Click on the ‘Link Configuration’ the following page will appear:
Follow the steps below to configure the URL Shortening Settings:
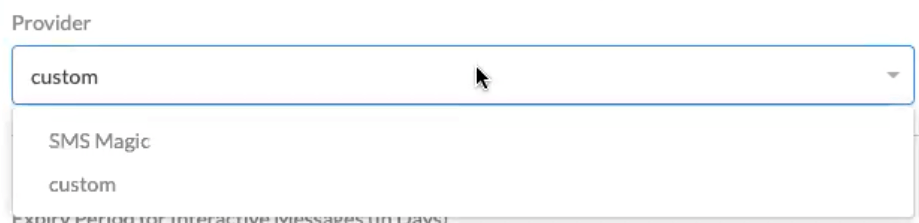
Select a ‘Provider’ from the drop-down list:
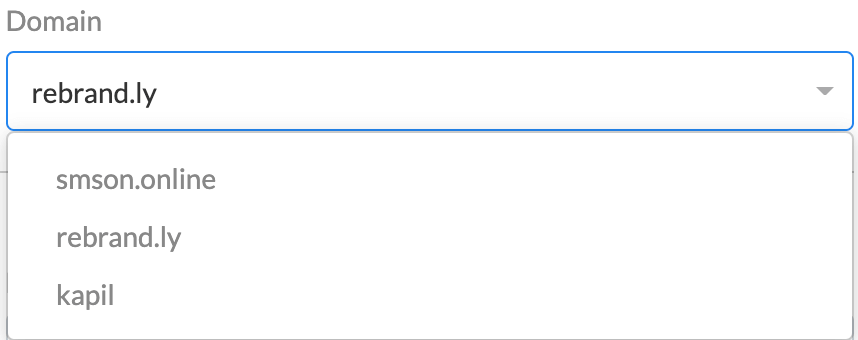
Select a ‘Domain’ from the drop-down list:
The expiry period for the shortened links needs to be set in the setting page for respective features: Interactive Messages’, ‘Bulk Messages’, and ‘Automated Messages’.
Notes:
1. To use the URL Shortening and Tracking feature, it must be first enabled for your account
2. The Workspace ID is a predefined field
Shortened Links
|
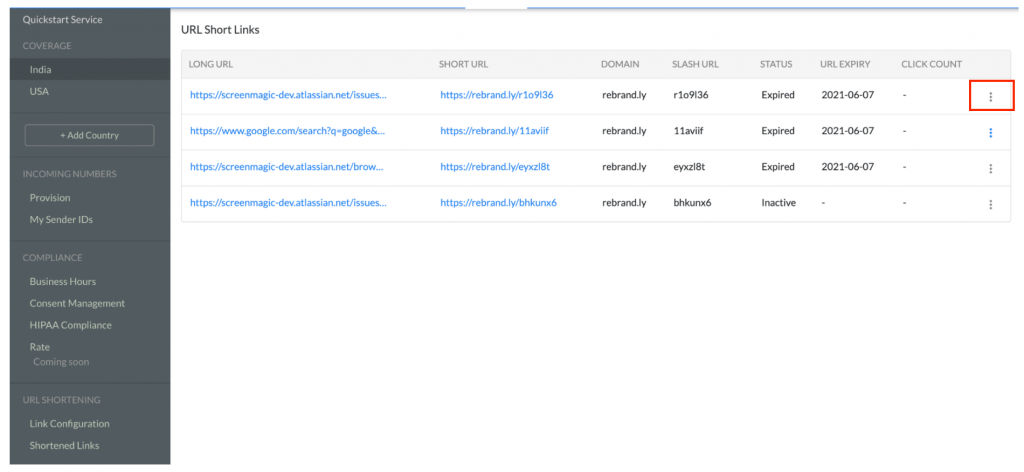
Here, the admin can get all the information about shortened links that are created from the account such as Long URL, Short URL, Domain, Slash URL, Status URL Expiry, and Click Count.
Note: Expired short links become a dead link.
Admin has the access to check the duration or expiry of the shortened links. Admins should ensure to remove short links from the templates before they expire.
Follow the steps below to Deactivate Short Links:
Click on the icon, the following options will appear:
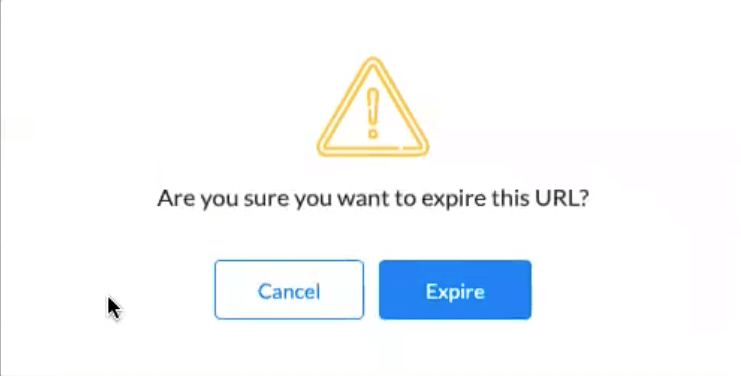
Click on ‘Deactivate’ the following message will appear:
Click onthe ‘Expire’ buttonto permanently expire the links
Click on ‘Cancel’ if you don’t want to expire the link
Deleting a Shortened URL
|
The option to delete short links has been provided purely for data cleanup. Any short link that is deleted would free up space and all existing click tracking records will be lost; the short link would become a dead link. Admins are advised to check with businesses and delete only those short links that are very old and have not been used in messages for some time.
Notes: 1. Admins are advised to ensure that short links are removed from templates before deleting them.`
Follow the steps below to ‘Delete’ Short Links:
Click on this icon the following option will appear:
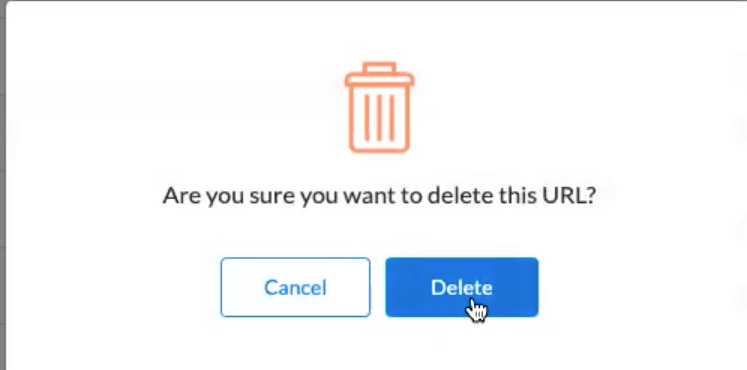
Click on ‘’Delete’ the following message will appear:
Click on the ‘Delete’ button to permanently delete the links
Click on ‘Cancel’ if you don’t wish to delete the links
Overview
|
This manual talks about the newCampaign, its features, menus, and the options to create and run campaigns. SMS-Magic allows users to run campaigns using SMS, MMS, WhatsApp channels to reach out to their target audience.
Campaign Introduction
With an enhanced UI, the new campaign comes with features such as the search bar, filters for a better search, edit and delete option for the scheduled campaigns, navigation bar, validation of contact records, mapping of merge fields, and compliance settings.
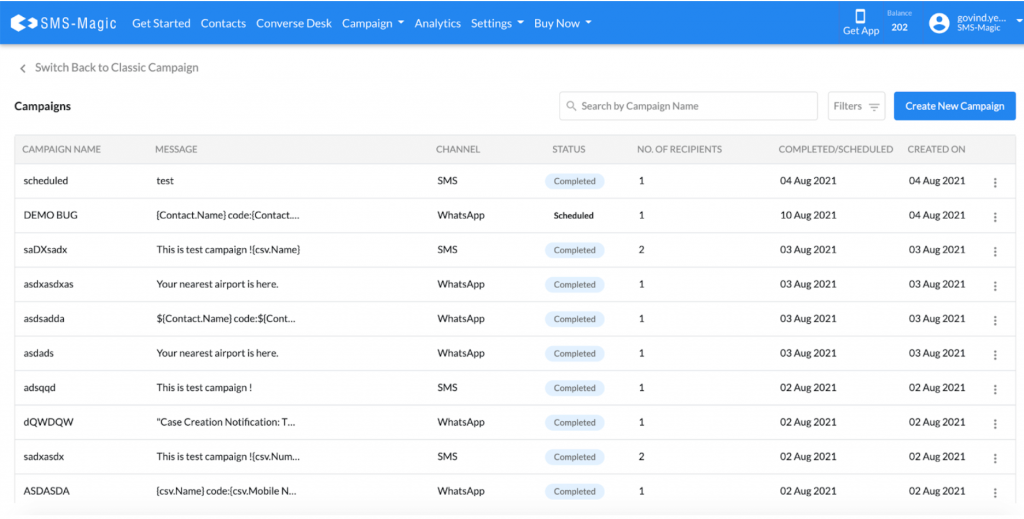
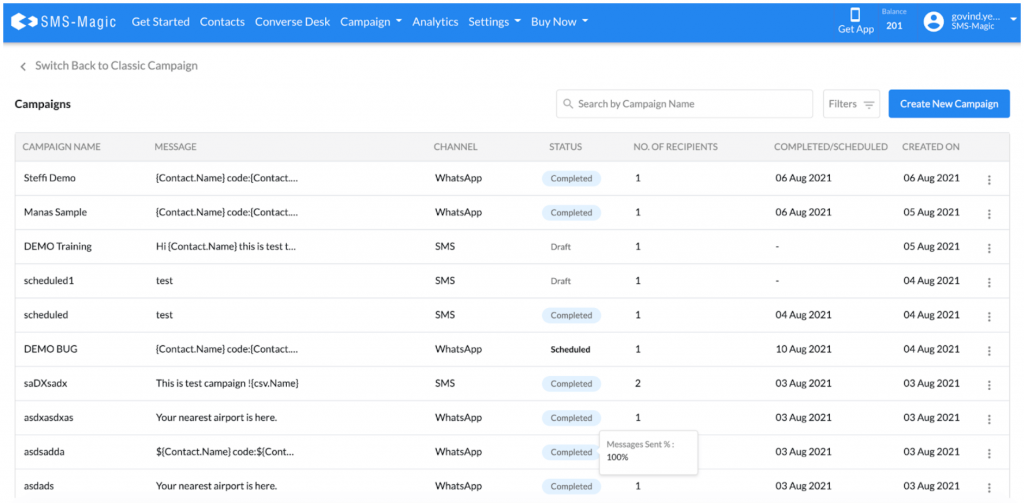
On the Campaign home page, users can view the list of campaigns created along with their details such as campaign name, message, channel, status, no. of recipients, the campaign created date, and the completed/scheduled date.
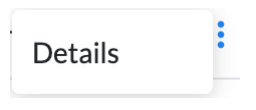
To check the details of a particular campaign, click on the three dots option and then click on the ‘Details’ button:
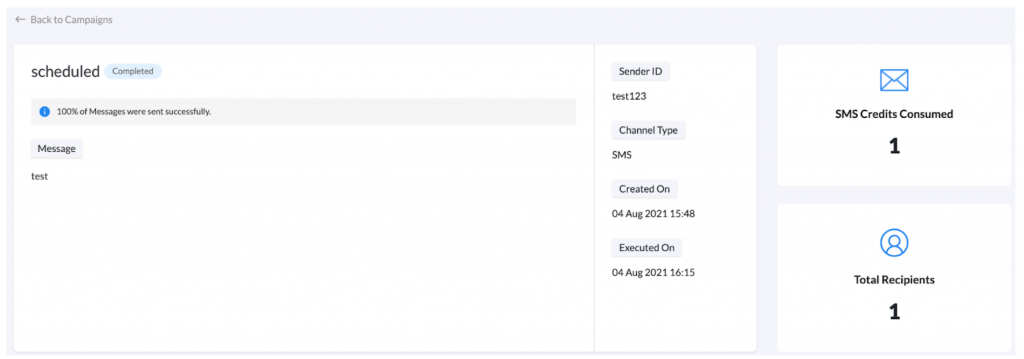
The following details page will appear:
Here, users can view campaign details such as the name, status, Sender ID, channel type, the campaign created date, executed date, SMS credits consumed, and no. of recipients.
To go back to the campaign list, click on the ‘Back to Campaign’ button on the top left corner.
Search Field
The Search field allows users to search for the campaign by its name.
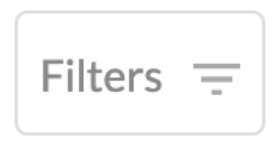
Filters Field
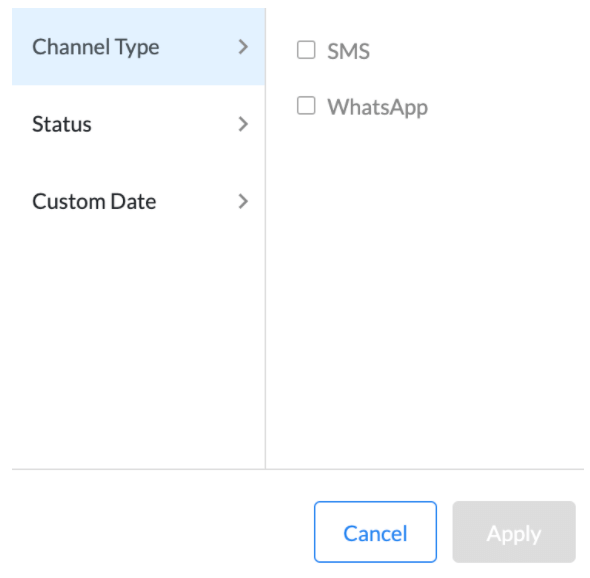
The Filters field allows users to apply filters and search for the campaigns accordingly. Click on the ‘Filters’ button, the following options will appear:
Users can apply channel filters by selecting the available channel types.
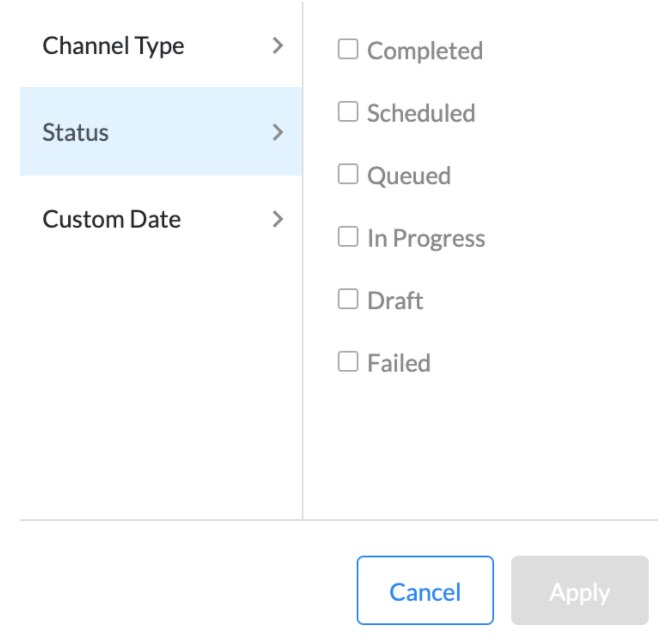
Users can also apply a status filter by selecting different status types such as completed, scheduled, queued, in progress, draft, and failed.
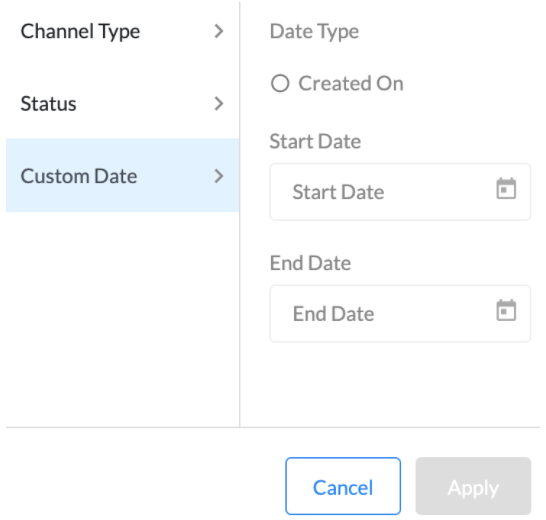
You can apply a custom date and search for relevant campaigns. Once you select all filters, click on the ‘Apply’ button to proceed. As per the filters applied, you get the campaign results.
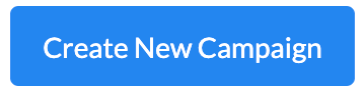
Create a New Campaign
|
To create a new campaign, click on the ‘Create New Campaign’ button.
The campaign creation process is divided into five steps namely, Define Campaign, Select Recipients, Compose, Test Message, and Send Message.
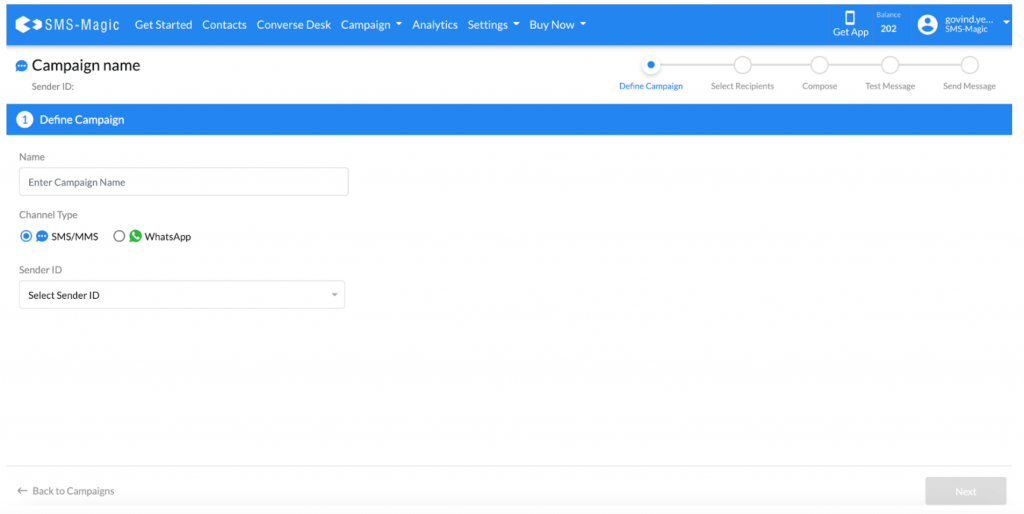
Step 1: Define Campaign
In this step, the user has to define the campaign and enter details such as the name of the campaign, channel type, and the Sender ID.
Enter the name of the campaign in the ‘Name’ field
Select the channel type, SMS, MMS, or WhatsApp
Note: As per WhatsApp Business Terms of Service, sending unwanted, non-personal, or bulk messages is a violation of their Terms of Service. Hence we recommend you to avoid sending such messages over WhatsApp
Select the Sender ID from the drop-down list
Click on the ‘Next’ button to proceed
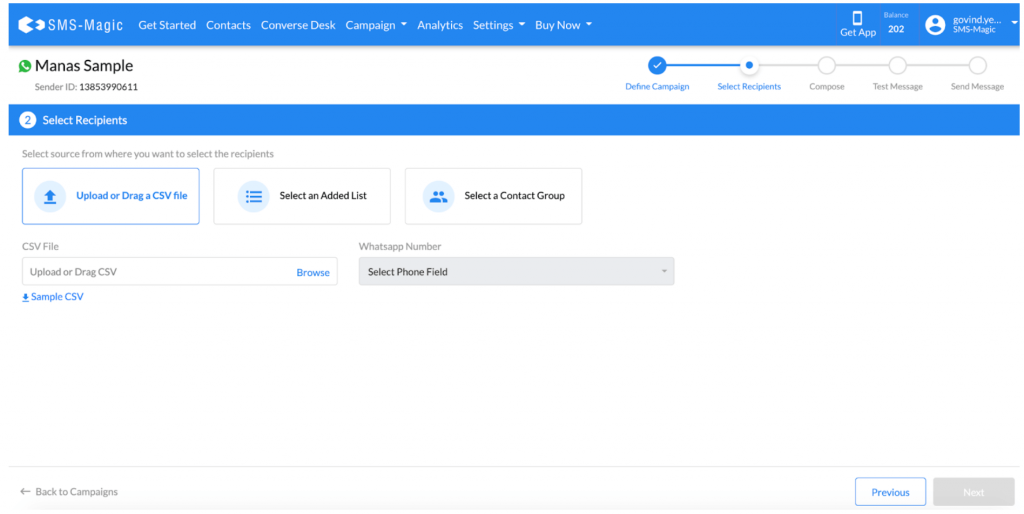
Step 2: Select Recipients
In this step, the user can select recipients in three ways, by uploading a CSV file, from an already existing list or by selecting a contact group.
Users can directly upload the CSV file by clicking on the ‘Browse’ button.
The second option is to select an added list from the drop-down list. Further, select the phone field for the respective channel from the drop-down list.
The third option is to select a contact group
Once you select recipients via any one of the three ways, click on the ‘Next’ button to proceed
Note:
The user needs to make sure that when they select the SMS channel, the list should consist of SMS numbers and for the WhatsApp channel, the list should contain WhatsApp numbers.
As per the channel selected, users should map the field of the CSV file that contains phone numbers.
Validation of records is done automatically on the selection of a contact list. This allows you to know how many contacts in the list are there with the right phone number.
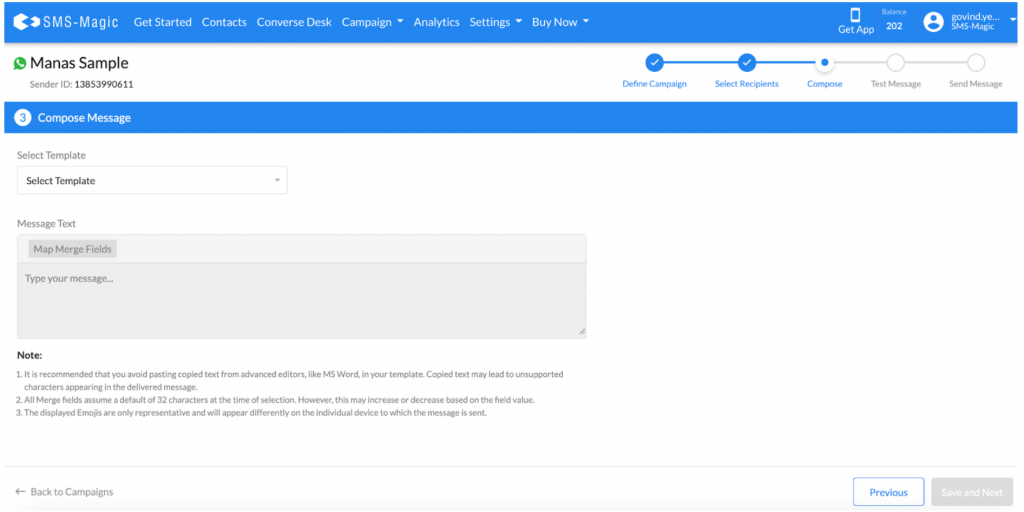
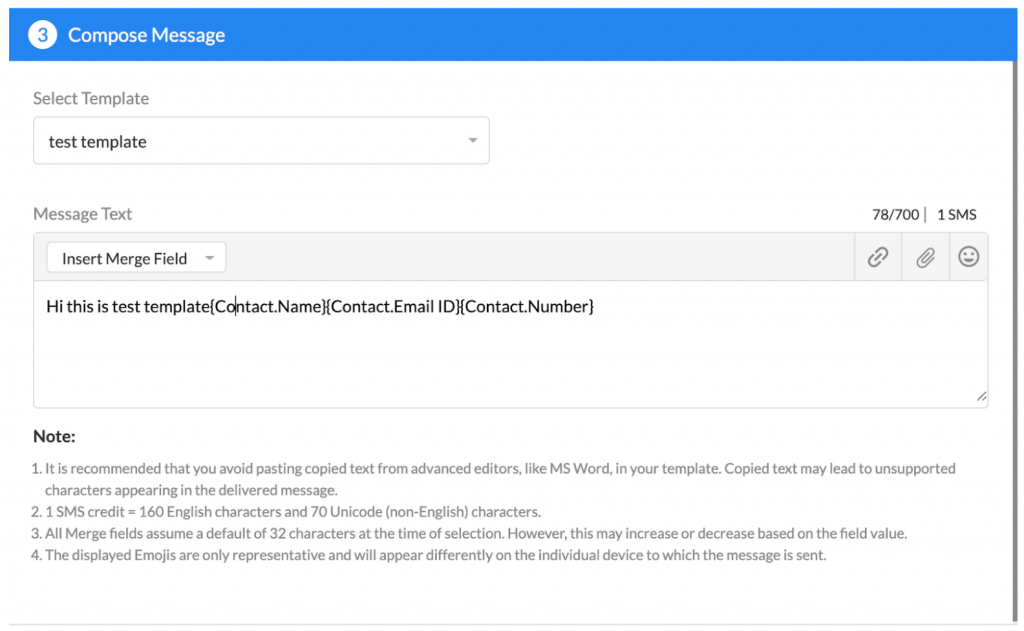
Step 3: Compose
In this step, users can select and edit the templates for the campaign they want to send. Here, the template selection will happen as per the channel type that was selected earlier.
Click on the ‘Select Template’ drop down to select a message template
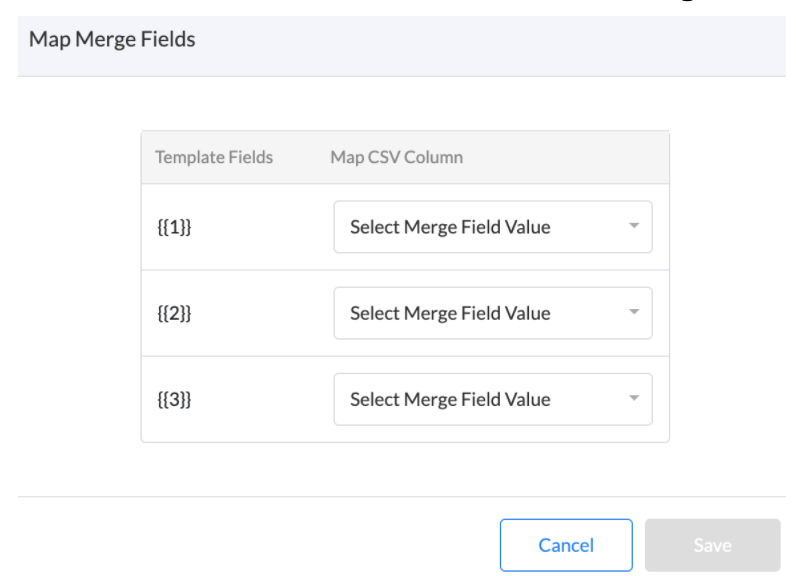
As per the template you select, map the merge fields by clicking on the ‘Map Merge Fields’ button. The following window will appear:
Click on the ‘Save’ button once you select merge field values for all fields of the template
If the channel type is SMS, you can also type your message in the given space
Click on the ‘Save and Next’ button to proceed
Note: To be compliant with WhatsApp business policy, editing the message templates in the text box is possible only in the case of the SMS and not WhatsApp.
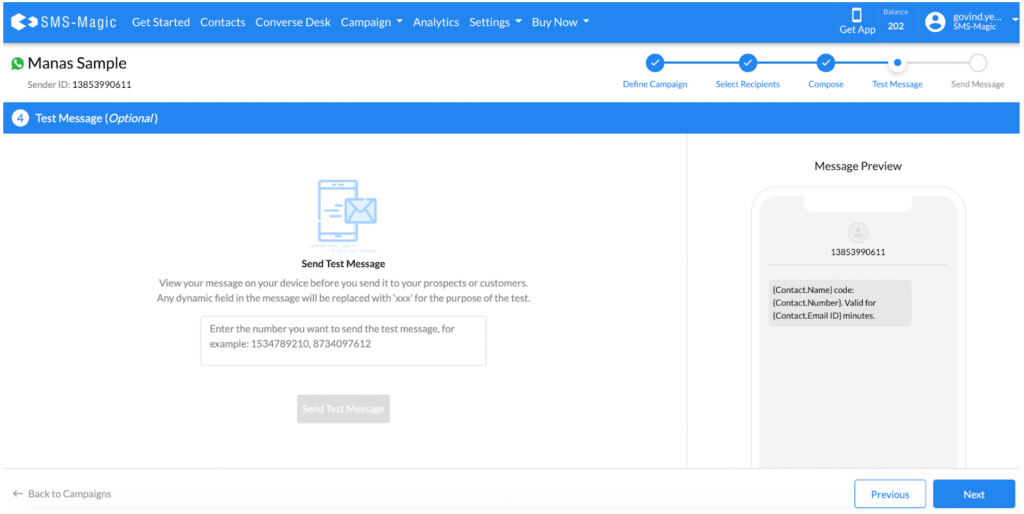
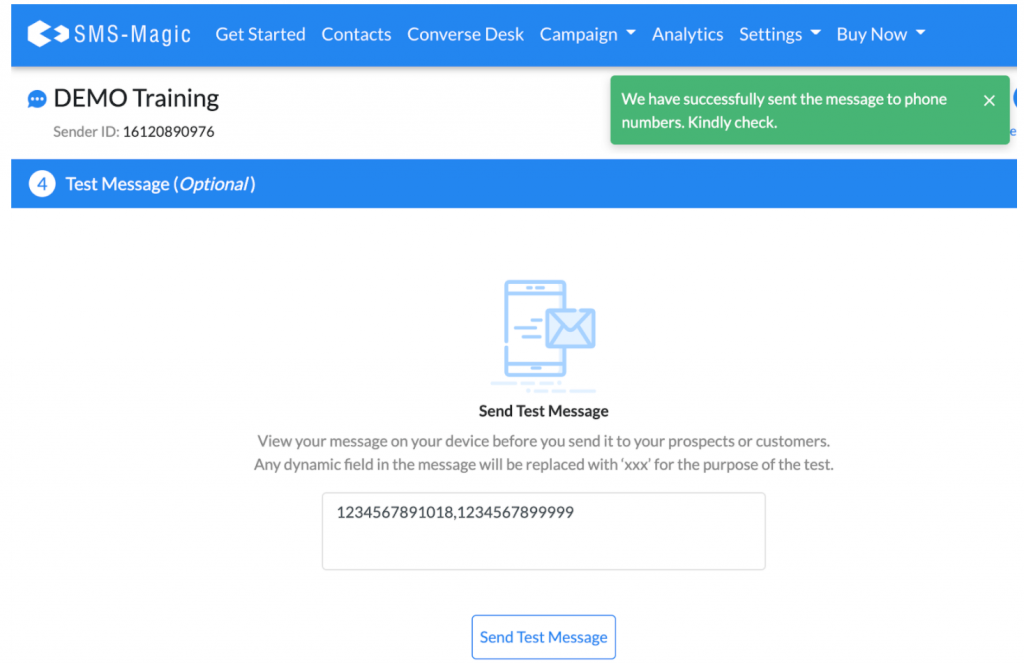
Step 4: Test Message
In this step, you can insert multiple numbers to send a test message.
Insert numbers in the box, separated by a comma, and click on the ‘Send Test Message’ button
You can see the message preview in the preview box on the right
Click on the ‘Next’ button to proceed to the next step of sending the message
Note: Test Message can be sent to more than one number, separated by a ‘,’.
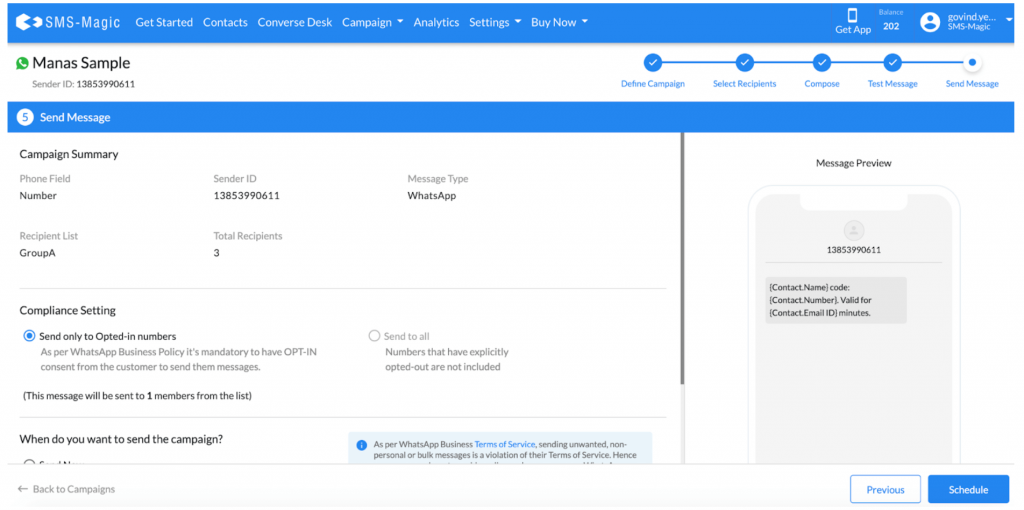
Step 5: Send Message
In this section, you can view the campaign summary with details such as the phone field, Sender ID, message type, recipient list, and the total number of recipients.
As per WhatsApp messaging policies, it is mandatory to have the customer’s consent as ‘Opt-in’ to send them any messages. In the Compliance Settings section, the ‘Send only to Opted-in numbers’ option is selected by default for the ‘WhatsApp’ channel.
In case you have selected SMS or MMS as a channel type, you get an option to send messages to all contacts or to only the opted-in contacts.
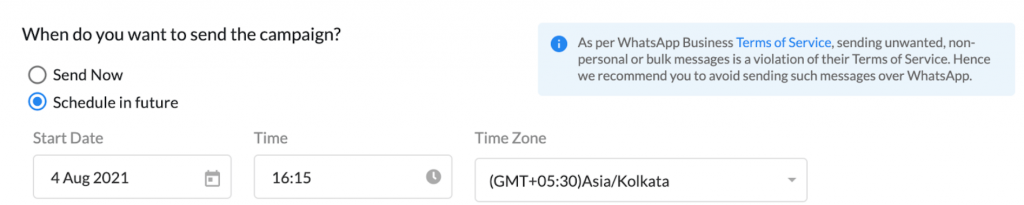
You can either choose to send the campaign right away by selecting the ‘Send Now’ option or schedule it for a future date by selecting the ‘Schedule in future’ option.
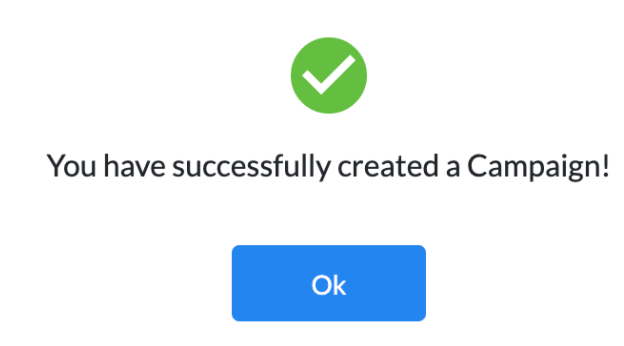
If you select the ‘Send Now’ option, the campaign will be sent and the following message will appear:
If you select the ‘Schedule in future’ option, you need to select the start date, time, and time zone from the respective fields.
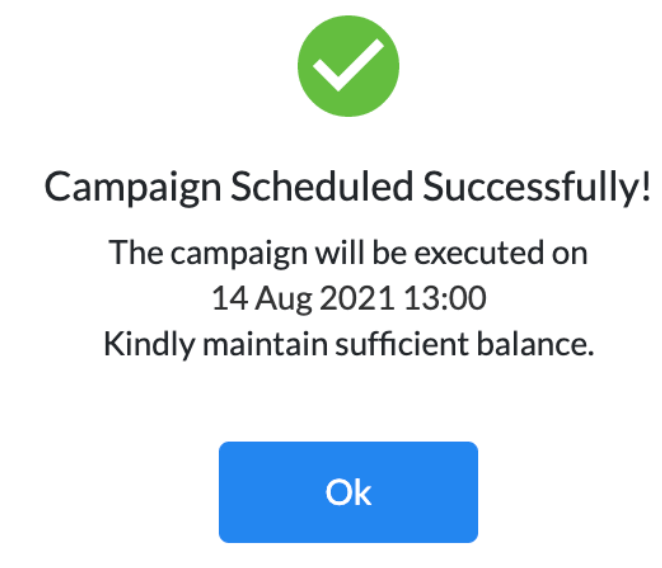
Click on the ‘Schedule’ button to schedule your campaign. The following message will appear:
Once the campaign is sent, you will be able to see it in the list of campaigns with its status:
Profile
|
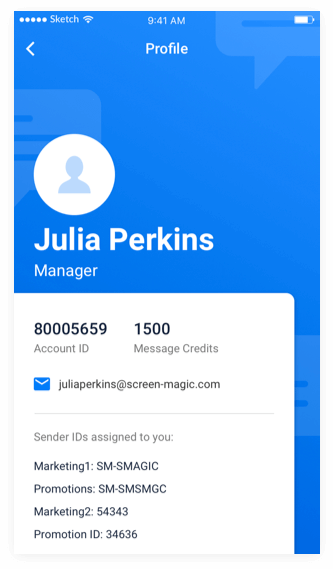
Here, users can view profile details such as account ID, message credits, email address, and the Sender IDs assigned. Users can also change their profile photos if required.